Brass Bar Makeover | Easy Thrift Store Flip
Thrifted brass tray makeover: From dingy, tarnished tray to glamorous brass bar.
I thrifted a tired, dingy, and tarnished brass tray at a thrift store. It had great potential and good bones. I purchased it for $14 and knew it would make a great bar. A mark on the bottom read Made In Hong Kong, so that told me it was definately vintage and I could see past the tarnish as it had some wonderful design detials. It just needed some cleaning and I was up for the job. This was an easy transformation/DIY and I was so pleased with the result. It looked even better than I expected. I’ll share some tips if you would like to turn a tarnished brass tray into a fab bar for your home or apartmen. It’s works especially well for someone who lives in a small space and might not have room for a bar cart.

Once upon a time there was a tarnished brass tray that wanted to be a bar when it grew up.
So, let’s start at the beginning, shall we? I found this tray at a thrift store and I proudly showed it to my thrifting friend, and her reply was “you bought that?” Obviously she was not a believer in this project, but I was! I could see the potential in this tray. Tired? Yes. Dingy. Yes. Dirty? Yes. But I could envision the end result. And I stuck to my commitment to turn this into the best, most fabulous makeover.

Seeing past the tarnish and envisioning what the brass bar could be.
Check out the photos below of what the brass tray looked like when I got it. The last photo shows the Made In Hong Kong mark on the bottom.


Brass polishing agent to the rescue.
The next step was figuring out how to clean it. I chose Brasso polishing cream because I already had that from a previous brass cleaning projest. You can buy it at grocery stores and Amazon however I have learned that there are some less toxic brass cleaning alternatives which you can check out here. Grab couple of old towels or rags to use with the polishing agent.

It just needed a good polishing.
This project took about 2 hours over the course of 3 polishing sessions. Below are some photos of the polishing in progress. I figured the tray was from the 1970s and was badly in need of some TLC.


Pass the elbow grease.
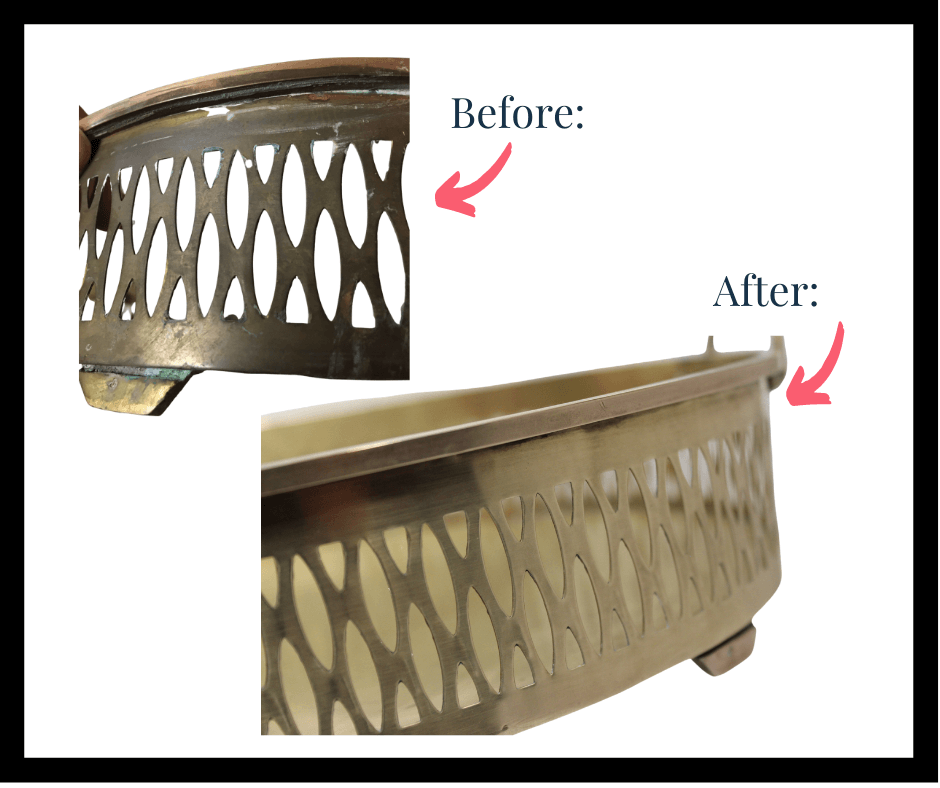
I have to admit, this was a bit of work and I used a good portion of the polishing agent to remove years of tarnish and neglect. Seeing the shiny brass come through that gray-green tarnish was so rewarding.

Wow! What a transformation.
I was so excited for how this brass tray turned out I immediately photographed it. I posted the transformation on my Facebook page because everyone loves a good before and after, and I loved how smashing the photographs were from staging it as a bar.


Staged it as a bar and sold it almost immediately on Facebook
I got so many compliments from this Facebook post and sold the bar to an college friend who’s daughter was turning 21. I was sad to see this brass tray go but I was excited that it was marking Gabby’s 21st birthday. Check out the photo below. I think Gabby liked it! It’s just so much fun to find the right person for each of my vintage finds! I take a lot of pride in that. It’s one of the best parts of my job.


Tips to find and makeover your own brass tray
If you’d like to find and transform a vintage or second hand brass tray into a glamorous bar here’s what I recommend:
- Figure out the ideal size and shape you like to have in a perfect world. Square? Rectangle? Oval? What will work best in your space? What would those dimensions be?
- Place to look for vintage and second hand trays would be thrift stores, flea markets, eBay and Etsy.
- Do not be afraid of the tarnish.
- Look for interesting details such as feet, a railing and handles. The brass tray I featured in this blog post had good bones and included all of those good design details.
- Choose a polishing agent. Again you can buy tried and true products like Brasso or more natural, less toxic cleaner like the ones recommended here.
- To clean the brass tray, use an old towel or rags to do the job. Heads ups, it might take an hour or 2 of polishing to achieve the desired result of a gleaming brass tray.
- Set your bar! Select the the location of your new bar tray. Add some soft, small, round cushions on the bottom if necessary to protect your furniture. Place your tallest liquor bottles in the back and the shorter ones in the front. Have guests over to celebrate your new brass bar! Cheers!
Watch the video I created that relates to this brass tray makeover below.
Share this post with your friends who might be interested in using a vintage brass tray to stage a glamorous bar in their home.


